About Me

My photo
El Paso, TX, United States
21, Army Wife, SAHM, Crafter, DIY-er, Bargainer, Crunchy green domestic Goddess, Cloth-diaperin', Baby wearin', breast feedin', organic eatin' Mama!! Follow me on IG @mrsfergiefresh Twitter: mrsfergiefresh Pinterest: Alexis Ferguson

Wednesday, February 26, 2014

Golden Beet Pasta with Beet Greens

I am on a mission to eat healthy, delicious food everyday. Sounds simple enough but not so with a mobile six month old getting into everything. So I did all the prepping for this recipe during nap time. I have never cooked with beets and I didn't even know beets had greens either, but this is definitely a repeat recipe. Even Henry loved the beets!

You will need:
1/3 cup pine nuts, used flax seed, not bad but not the same effect
4 tablespoons olive oil or butter
2 large onions chopped
3-4 cloves of garlic minced

2 bunches of beets, I used 1 bunch but I wished I used 2 because it is so good! Peel and slice into thin rounds then cut in half
12 oz(1 box) of pasta your choice
1/3-1/2 freshly shredded parmesan cheese. The real stuff not that powdered cheese flavored crap.

1) Toast pine nuts or flax seeds until lightly brown, set aside
2) Saute onions until soft, add garlic and beet greens.
3) boil beets until soft, reserve 1 cup beet water, drain and set aside.
4) Boil pasta, drain and return to pot. Combine pasta, sautéed greens, beets, flaxseeds, cheese and 1/4 cup beet water until well incorporated.
5) Top with extra Parmesan cheese and enjoy this delicious vegetarian dish!


To DIE for Salsa and Guacamole

So I've been putting off this post for a while because its not an exact recipe. I never make the same guacamole or salsa twice so it is difficult to put into a recipe. No tomato, jalepeno, or onion has the exact same taste. But I have been slacking in the blogging department, and a friend has been begging for me to post it so here it is.

You will need for salsa:
oil, olive, grapeseed or coconut are great, stay away from corn, canola.
5-7 large tomatoes
about 1/2 a bundle of cilantro
1/2-1 yellow onion
1/2-2 limes
1/2-2 jalepenos, depending on the spiciness is how many you want to use. I rub my finger on the cut side of the pepper and touch my tongue. If it taste really spicy i only use half and add more if needed.
4-5 garlic cloves
salt to taste
food processor, you can use blender but be careful on how much you blend, you don't want soupy salsa.


1) slice your tomatoes and jalepenos in half, lightly coat in oil and bake at 400 until brown edges appear and your tomatoes shrivel a little, about 15-20 minutes. This helps bring out the flavor, makes your salsa a little less watery and a little more flavorful.

2)Put your tomatoes, jalepeno(s), cilantro, 1/2 an onion, garlic and salt cloves in the processor. Add the juice of 1/2 a lime to start, too much lime can ruin your salsa!

3) Process and taste, adjust, taste again until it is how you like it.


You will need for guacamole:
5-6 Avocados
1 medium tomato
1/4 of an onion
1/2-2 lime juice depending on personal preference
1/2 jalapeno
4-5 garlic cloves
handful of cilantro
salt to taste

I like my guacamole smooth so I use a processor. if you prefer it chunky go the old school way and use a potato masher and dice all the ingredients.

1) Repeat step 1 for the salsa for your guacamole, if you are making both it is easier to do them at the same time.

2) Put everything in the processor and puree! season to taste with salt. If you are making ahead for a party of something I recommend pressing plastic wrap to the surface so that you don't get that gross oxidation on top that turns your green guac brown.


Friday, February 14, 2014

Organic Butternut Squash Soup

So this past grocery haul was my favorite so far! We bought so many beautiful vegetables that I have never cooked with before. One of them being Butternut Squash which was tonight's dinner, and turned out amazing! It was a little time consuming but I would suggest you prep all of your vegetables before you begin cooking. You will also need an emulsifier blender, I bought mine a while ago as a hand held mixer with interchangeable heads, and the second head is an emulsifier. I think you could use a blender but it could get messy.
Ingredients:
preferably organic
1 medium to large Butternut squash, peeled and chopped into small pieces, the smaller the better
1 large onion, diced
8-10 baby bells, sliced
5-6 garlic cloves, minced
1-2 cups spinach
32 oz broth, preferable vegetable, I made mine from boiled onion and garlic skins
salt and pepper if you'd like

If you have everything prepped this will be super easy to do, I know because I did not prep and it probably took me twice as long to make. 

1) Saute your onions and mushrooms in butter or oil and set aside. I prefer butter's flavor in this recipe.
2) Saute your squash and garlic until soft, I used a lid so the steam could help the cooking process.
3) set broth to simmer and add squash, emulsify until there are no chunks left. 
4) Add in spinach, mushrooms and onions.

Enjoy a healthy, delicious, and filling vegetarian recipe. I promise made from scratch can be easy! make sure you sign up for the email updates at the top of the page! I will be cooking with rainbow chard and golden beets later this week! 
Thanks for reading, until next time,

Mostly Meatless Mama 


Recipe adapted from: http://theharvestfoodblog.com


Saturday, February 8, 2014

Baby Led Weaning or BLW

First things first, what is baby led weaning? "Baby Led Weaning, quite simply, means letting your child feed themselves from the very start of weaning*."  "In the UK, ‘weaning’ means ‘adding complementary foods’, whereas in the States it means ‘giving up breastfeeding’."-  babyledweaning.com 

kellymom.com states:
[The following organizations recommend that all babies be exclusively breastfed (no cereal, juice or any other foods) for the first 6 months of life (not the first 4-6 months):
World Health Organization
UNICEF
American Academy of Pediatrics
American Academy of Family Physicians
Australian National Health and Medical Research Council
Health Canada

Reasons for delaying solids

Delaying solids gives baby greater protection from illness.


Although babies continue to receive many immunities from breastmilk for as long as they nurse, the greatest immunity occurs while a baby is exclusively breastfed. Breastmilk contains50+ known immune factors, and probably many more that are still unknown. One study has shown that babies who were exclusively breastfed for 4+ months had 40% fewer ear infections than breastfed babies whose diets were supplemented with other foods. The probability of respiratory illness occurring at any time during childhood is significantly reduced if the child is fed exclusively breast milk for at least 15 weeks and no solid foods are introduced during this time. (Wilson, 1998) Many other studies have also linked the degree of exclusivity of breastfeeding to enhanced health benefits (see Immune factors in human milk).


Delaying solids gives baby’s digestive system time to mature. 


If solids are started before a baby’s system is ready to handle them, they are poorly digested and may cause unpleasant reactions (digestive upset, gas, constipation, etc.). Protein digestion is incomplete in infancy. Gastric acid and pepsin are secreted at birth and increase toward adult values over the following 3 to 4 months. The pancreatic enzyme amylase does not reach adequate levels for digestion of starches until around 6 months, and carbohydrate enzymes such as maltase, isomaltase, and sucrase do not reach adult levels until around 7 months. Young infants also have low levels of lipase and bile salts, so fat digestion does not reach adult levels until 6-9 months.


Delaying solids decreases the risk of food allergies.

 
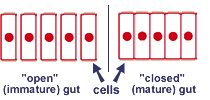
It is well documented that prolonged exclusive breastfeeding results in a lower incidence of food allergies (see Allergy References). From birth until somewhere between four and six months of age, babies possess what is often referred to as an “open gut.” 
This means that the spaces between the cells of the small intestines will readily allow intact macromolecules, including whole proteins and pathogens, to pass directly into the bloodstream.This is great for your breastfed baby as it allows beneficial antibodies in breastmilk to pass more directly into baby’s bloodstream, but it also means that large proteins fromother foods (which may predispose baby to allergies) and disease-causing pathogens can pass right through, too. During baby’s first 4-6 months, while the gut is still “open,” antibodies (sIgA) from breastmilk coat baby’s digestive tract and provide passive immunity, reducing the likelihood of illness and allergic reactions before gut closure occurs. Baby starts producing these antibodies on his own at around 6 months, and gut closure should have occurred by this time also. See How Breast Milk Protects Newborns and The Case for the Virgin Gut for more on this subject.

Delaying solids helps to protect baby from iron-deficiency anemia.


The introduction of iron supplements and iron-fortified foods, particularly during the first six months, reduces the efficiency of baby’s iron absorption. Healthy, full-term infants who are breastfed exclusively for periods of 6-9 months have been shown to maintain normal hemoglobin values and normal iron stores. In one study (Pisacane, 1995), the researchers concluded that babies who were exclusively breastfed for 7 months (and were not give iron supplements or iron-fortified cereals) had significantly higher hemoglobin levels at one year than breastfed babies who received solid foods earlier than seven months. The researchers found no cases of anemia within the first year in babies breastfed exclusively for seven months and concluded that breastfeeding exclusively for seven months reduces the risk of anemia. See Is Iron-Supplementation Necessary? for more information.
Delaying solids helps to protect baby from future obesity.


The early introduction of solids is associated with increased body fat and weight in childhood. (for example, see Wilson 1998, von Kries 1999, Kalies 2005)


Delaying solids helps mom to maintain her milk supply.

 
Studies have shown that for a young baby solids replace milk in a baby’s diet – they do not add to baby’s total intake. The more solids that baby eats, the less milk he takes from mom, and less milk taken from mom means less milk production. Babies who eat lots of solids or who start solids early tend to wean prematurely.


Delaying solids helps to space babies.


Breastfeeding is most effective in preventing pregnancy when your baby is exclusively breastfed and all of his nutritional and sucking needs are satisfied at the breast.


Delaying solids makes starting solids easier. 


Babies who start solids later can feed themselves and are not as likely to have allergic reactions to foods.
Most babies will become developmentally and physiologically ready to eat solids by 6-9 months of age. For some babies, delaying solids longer than six months can be a good thing; for example, some doctors may recommend delaying solids for 12 months if there is a family history of allergies.
Although some of the reasons listed here assume that your baby is breastfed or fed breastmilk only, experts recommend that solids be delayed for formula fed babies also.]


"after all is said and done, it pretty much comes down to this: There are no benefits, only risks, to starting a baby before they're biologically ready, and since we can't see the gut, we have to go by outside cues, and waiting until a bare minimum of 6 months is the safest way to play it. If a couple weeks is the difference between a gut infection and not, the choice is pretty clear." ---thestir.cafemom.com

I cut and pasted a lot of the science behind delaying solids because those were the same websites I read that helped solidify my decision to delay starting solids until 6 months and following through with baby led weaning. I am only a couple of weeks into BLW but I started with carrots steamed really soft he really liked them and only gagged one time. next we tried avocados cut into thick slices and he absolutely loved them! he probably ate 1/4 of the avocado in one sitting. Next was banana, I just handed him half, and he was sort of so-so about the whole thing, like he could take it or leave it which really surprised me because I had heard babies love bananas. Today he had some cantalope and let me tell you, I have never seen him demand another piece like he did with the cantalope.


Another awesome thing about baby led weaning is that you can save so much money! Seriously, who doesn't love saving money? If you don't you're in the wrong blog, dude/lady. If you have any further questions for me feel free to leave comments in the comments section below. make sure you like my facebook page, and sign up for my email notifications for when a new post is up! thank you for reading and I hope this post can help you make a decision on what's best for your family when it comes to introducing solids.

Thursday, February 6, 2014

Skinny Brownies

So I stumbled upon this recipe while looking for something to do with my vanilla yogurt that was just starting to turn sour. I literally just opened it today and had to do something with it fast. I came across this "skinny" recipe from sallysbakingaddiction, and normally I am a little weary of anything "skinny". I try my best to avoid things that are labeled fat-free, low-fat, sugar-free, because typically they are full of other fake sugars and chemicals that are worse than just eating the sugar or fat by themselves. But this recipe had none of that so I said why not?


You will need:
3/4 cup creamy peanut butter
6 oz. vanilla yogurt(can use Greek is recommended, I did not though)
1/4 cup milk(use skim for less cal)
1 large egg(or two egg whites)
1/4 teaspoon salt
1 teaspoon baking powder
1 cup sugar
1/2 unsweetened cocoa powder
1/2 old fashion rolled oats(She recommends to process the oats first but I already have a powdered oats mix that I add to smoothies so I used that)


  1. Preheat oven to 350F. Line an 8x8 baking dish foil and spray with oil.
  2. Place all of the ingredients except for the peanut butter into food processor. Grind the oats first in the processor, then add wet ingredients and blend well. finally add dry ingredients and mix well.
  3. Pour batter into prepared baking dish. Microwave peanut butter for about 30 seconds. Drop melted peanut butter by spoonfuls onto the batter, swirling gently with a knife to create a marbled effect.
  4. Bake for 20-25 minutes or until brownies begin to pull away from the sides of the pan. Wait until COMPLETELY cooled before cutting into. Hard I know but it makes them much easier to cut into.


Wednesday, February 5, 2014

Crockpot Black Bean Soup

Another one of my make-it-up-as-you-go recipes! It can be made vegetarian and you can add or subtract pretty much any ingredient you want.

You will need:
3 Cups black beans, (soaked overnight or boiled for 5 minutes)
4 cups broth (your choice)
1 can Garbanzo beans, drained and rinsed (organic)
3 carrots sliced about 1/4-1/2 inch thick
3-4 stalks celery sliced
5-6 garlic cloves minced
1 onion chopped
1 can stewed tomatoes(organic)
1 1/2 cups water
teaspoon of cayenne pepper
tablespoon garlic powder
pinch of salt and pepper


So to start you need to prep your beans, anytime I think of making beans I totally forget that they need to soak for at least 8 hours. Well, F that! I recently came across a tip to boil your beans on high for 5 minutes and it is more or less an equivalent to soaking overnight.

After you soak or boil your beans put them in your crockpot along with all the other ingredients. Everybody in the pool at once. cook on high for 5-6 hours, season additionally to taste.


Granola bars


So I read through a bunch of recipes online and decided to wing my own granola bars hoping they would turn out good. Well, they turned out amazing! So easy to make too. I had all of these ingredients laying around my kitchen so it was practically free to make. Keep in mind this is just a base recipe you can pretty much add and subtract anything you want or don't want in your bars.


Ingredients: 
2 cups rolled oats
Dried cranberries(I'll ballpark it around a 1/2 cup)
Shaved almonds(1/2 cup)
Peanut butter chips (1/2 cup)
Sunflower seeds(1/2 cup)
Tablespoon of cinnamon

1 cup brown sugar
1/2 stick of butter
3-5 tablespoons honey, raw local if you have the option
4 tablespoons peanut butter 

Foil
Baking sheet or casserole dish

1) Mix the first set of ingredients really well and set aside. 

2) melt butter in a pan on med/low heat, add brown sugar, honey and peanutbutter. Be careful not to burn or let bubble.

3) line casserole dish or baking sheet with foil.

4) combine butter mixture with dry ingredients and incorporate well.

5) pour into baking sheet and pack granola down. 

6) Bake for 10 minutes at 350 degrees.

7) pull from oven and allow to cool but cut bars before it completely sets.

8) refrigerate until completely cool then portion in plastic wrap/foil/ziplock bags for a quick treat on the go.


Tuesday, February 4, 2014

Cheesy Quinoa Stuffed Peppers

What you will need:

Peppers 1-2 per person, I used poblanos but if spice is an issue try using a red or yellow bell pepper.
Quinoa, I used a non-gmo box variety "Nature's Earthly Choice"
Avocado for garnish
Green chive onions, the green part chopped and set a side
1 cup Organic spinach, try to buy organic because of its porous leaves they tend to hold more pesticides
1 cup finely shredded cheese, I chose 1/2 cup pepper jack, 1/2 cup colby jack
1 tblspn butter
oil, any can be used I prefer something like grapeseed, olive or coconut oil.\

You will also need:
Foil
baking sheet

Preheat oven to 350

1) Prep your poblano peppers by slicing around the stem and pulling the majority of the seeds out. Cut a slit in the pepper where it will be facing up. rince with water to get all of the seeds out. rub pepper down with oil on the outside. Bake in oven for 10 minutes.

2) Cook quinoa as directed on box, when almost done add spinach and chives. when it is done cooking add butter and cheese. Mix until cheese is completely melted.

3)Once your peppers have a chance to cool, hold open flaps and fill with quinoa mix. put back in the oven for an additional 5-7 minutes.

4) Garnish with extra cheese and avocado. Enjoy!